One of the most important issues in photography is lighting. It is capable of breaking an image or making it, which affects the mood, clarity, and the overall image. Lighting techniques are critical towards producing gorgeous photos whether you are working under natural or artificial lighting. This article will discuss the tips of lighting that every photographer must be conversant with in order to make perfect photos.
Natural Light as compared to Artificial Light
The lighting can be of great impact to your photos. The effects of natural light change during the day and create various effects:
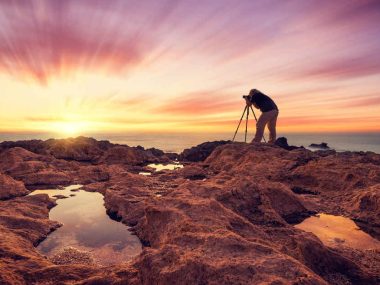
- Golden Hour: This is the hour immediately before and right after the setting sun that gives warm, soft light that gives added clarity to details and surfaces.
- Harsh Midday Sun: This is the light that is capable of producing intense shadows and accents. When you need to shoot at this period, seek some shades or reflectors to tone down the politeness of the light.
Dramatic effects can also be produced by artificial lighting like flash light or studio lights. The knowledge of how to play around with both kinds of light will enhance your photography, alongside your ultimate guide camera setup.
Expert Insight
According to photographer Jane Smith, it is important to know about the quality of light. It is not simply the amount of light that one needs, but the type of light that one needs in the subject.
Use Reflectors to regulate Light
Reflectors are a cheap and flexible light control tool. They reflect the light onto your subject, and fill the shadows making a more balanced exposure. The following are a few guidelines when using reflectors:
- Types: You may use white, silver or gold reflectors. White is being used softly and silver gives a more acute reflection. Gold gives the touch of warmth to your images.
- Placement: You should place your reflector in a position that will reflect and focus on your subject filling in the shadows but without overshadowing the natural light.
Real-Life Example
Take the case of landscape photographer Tom who habitually wears reflectors when he is taking portraits during the golden hour. He increases the features of his subjects by reflecting light, without losing the beautiful warm colours of the setting sun.
Play with Backlighting
The situation in which the light source is positioned at the back of the subject matter is called backlighting. The method has the capability of producing exquisite figures and exceptional effects. The following is how to maximize on backlighting:
Silhouettes: Have your subject stand in front of a bright light, e.g. in the sun. You can adjust exposure so the subject can be dark on a bright background.
Glowing Edges: This is done with shallow depth of field to produce a dreamy ethereal look where the subject is lightened on the sides of the face bringing out details such as the hair or foliage.
Expert Tip
Professional photographer Lisa Johnson says, Backlighting can make magic out of regular scenes. It is just that you watch your camera settings to prevent overexposure.
Master the Use of Shadows
Shadows may be used to add depth and drama to your photographs. Creativity in using shadows can make your compositions very dramatic. Here are some tips:
Add Dimension: Add shadows to your photographs to develop layers. Make sure your subject is placed in such a way that it creates shadows over the scene making it interesting and rich.
Play with Contrast: Contrast lighting can be used to make a bold image. Seek out circumstances in which the shadows are intense and call upon them to accentuate the shapes and forms.
Real-Life Example
Take the case of a street photographer who takes pictures of the city. They can play with shadows by placing themselves so that the shadows cast on their subjects to achieve a dynamic composition that will attract the attention of the viewer.
Use Soft Light for Portraits
Light that is soft is commonly used in portrait photography because it minimizes ugly shadows and makes one appear flattering. Soft light can be obtained in the following ways:
Diffusers: Diffuse bright daylight or artificial light that is unkind with the use of a diffuser. This may be as plain as a white sheet or an advanced diffuser.
Cloudy Days: Cloudy days would give diffusing effects on the natural light and produce even lighting. Use this to your advantage when making an outdoor portrait.
Expert Insight
The portrait photographer Mark Thompson says that the best friend of portrait photography is the soft light. “It blushes away the skin tones and prevents shadowing that is not flattering.
Adjust Your Camera Settings
The camera settings are important in the light capturing. The following are some of the important settings:
L: Turn up the ISO under low-light conditions in order to get more light, though at the expense of noise.
Aperture: The higher the f-stop number the greater the amount of light entering the camera; this is desirable when in a dark environment.
Shutter Speed: it is advisable that your shutter speed is not slow because it will result in motion blur particularly in low light. One such rule is to have a shutter speed that matches your focal length at least.
Real-Life Example
When a wildlife photographer is taking a shot in the early mornings, he or she can increase the ISO to 1600 and open the aperture to f/2.8 so they can get the detail of the bird in flight and strike a balance between the light and clarity.
Color Temperance Experiment
Knowing about the color temperature would enable you to develop mood in your pictures. The temperature of light sources is a property that has varying values based on the source of light and is measured in Kelvin (K):
Warm Light: The light at the sunset and sunrise is warm (approximately 2000-3000K), which makes the atmosphere cozy.
Cool Light: Daylight is colder (within the range of 5000-6500K), and it is appropriate to more neutral colours.
Real-Life Example
Landscape photographer Anna tends to use different white balance settings when she goes out to photograph at various times of the day. She uses her camera on the cloudy setting at the time of sunset to further intensify the warmth of the sky colors, which are more vivid and lively.
Practice and Experiment
Lastly, practice and experiment is the best tip for lighting. You should spend time taking shots under varied lighting conditions, experimenting and seeing what suits you the most. Every setting has its own opportunities and the more you can practice, the more you will learn to see the light.
Conclusion
Lighting is another important part that needs to be mastered to get amazing pictures that appeal to the residents. With an idea of the quality of light, knowing how to use reflectors, trying back lights, and changing your camera setting, you will be half-way to improving your photography. Always, every shot is a learning and a growth opportunity as a photographer. So go get your camera and get out there and begin playing around with light!